s

News

A Gâteau Concorde recipe for Christmas

When I was a teenager a friend had this cake as her birthday cake and I became obsessed with finding a recipe for it!

The fêted Parisian chef Gaston Lenôtre designed menus for Air France and created this dessert as a tribute to the inaugural flight of legendary Concorde aircraft in 1969. The gâteau is a combination of layers of chocolate meringue and chocolate mousse. Florence Fabricant, a writer for the New York Times describes it as "the ultimate dacquoise, mousse layered with crisp meringue collapsing into a creamy pillow at the touch of a fork."

Edd Kimber, the inaugural winner of the Great British Bake-Off has produced a magnificent version of the cake.

The recipe is from his book “Say it with Cake” by Edd Kimber published by Kyle Books.

Gâteau Concorde

Ingredients

6 large egg whites

60 g caster sugar

300 g icing sugar

30 g cocoa powder

icing sugar or cocoa powder, for dusting

For the chocolate mousse

185g dark chocolate (around 70%), finely chopped

500ml double cream

Method:

Step 1

Preheat the oven to 120°C and line three baking sheets with baking parchment. Using a 20cm cake tin as a template, draw a circle on each piece of parchment, then turn it over so that the drawing is underneath.

Step 2

Put the egg whites into a clean, grease-free bowl and, using an electric mixer, whisk until they form stiff peaks. Slowly pour in the caster sugar and whisk until the meringue is stiff and glossy. Sift the icing sugar and cocoa powder over the meringue and gently fold together, being as gentle as possible.

Step 3

Spoon the meringue into a piping bag fitted with a 1cm wide plain piping tip and pipe three discs on the baking parchment using the drawn templates, piping in a spiral starting at the centre and working outwards. Using the remaining meringue, pipe long strips onto the prepared trays alongside the discs (keep some space between them as they will expand a little in the oven.  Bake for about 1 hour 40 minutes or until firm and crisp. Turn off the oven and allow the meringues to cool in the oven for 2 hours.

Step 4

To make the mousse, melt the chocolate in a large heatproof bowl set over a pan of gently simmering water, making sure the base of the bowl doesn’t touch the water.

Step 5

Remove from the heat and leave to cool. Whisk the cream to soft peaks then pour it into the bowl with the chocolate and whisk to combine. The resulting mousse should be fairly thick and be able to hold its shape, but not so thick it can’t be spread easily. If it is too thick and looks overwhipped, pour in a little extra cream or milk and stir to loosen the mousse.

Step 6

To assemble the cake, use a little of the mousse to stick the first meringue disc to a cardboard cake board or serving plate. Spread about a third of the mousse over the meringue and then add another meringue and repeat the process. Top with the final meringue and then coat the top and sides of the cake with the remaining third of the mousse.

Step 7

To finish the decoration, use a serrated knife to very gently cut the meringue strips into pieces. Lightly press these all over the cake and lightly dust with either icing sugar or cocoa powder. You can either serve the cake now or you can freeze it for a few hours; this will soften the meringue slightly. If you do freeze the cake, thaw it in the fridge for a few hours before serving.


A Festive Raspberry Trifle topped with Italian Meringue Brulee

This festive trifle is a true show-stopper and, unlike other trifles it does not go all squishy in the middle when the sponge gets too wet. The even better news is that the recipe is gluten free! The sponge, jelly and custard can be prepared the day before needed but I recommend assembling the trifle on the day of your celebrations. It will feed around 15 very hungry friends and whanau.

Step 1: Make the Sponge  

1 cup caster sugar

2 tablespoons water

4 eggs, separated

½ teaspoon vanilla

1 ½ cups cornflour

1 teaspoon (GF) baking powder

½ teaspoon salt

Preheat oven to 180°C.  Spray 2 shallow 23 cm sponge tins with baking spray and line the bases with baking paper then spray the paper too.  Note, it is important to use proper shallow sandwich or sponge tins as the cake won’t rise properly in a spring form or deeper tin.

Place sugar and water in a microwave bowl or small saucepan and bring to the boil.  The sugar does not have to dissolve completely.

Beat the egg whites until stiff, then slowly with the mixer running, dribble in the hot sugar and water solution.  Beat really hard.  Add the egg yolks and vanilla then carefully fold in the sifted dry ingredients.  Be very gentle with the folding process.  Carefully pour into the prepared tins and bake for 18 – 20 minutes.  As soon as you remove the sponges from the oven, drop the tins from knee height square on the floor – this tactic works to that “shock” the cakes and stopping the sponges from deflating.  Cool for two minutes in the tins then turn out onto a wire rack and carefully peel off the paper and cool.

You will only need one of the sponge cakes for the trifle so pop the other sponge in the freezer and save for another trifle-worthy celebration!

This sponge recipe is by Jo Seager.

Step 2: Make The Jelly

2 tablespoons (28g) powdered gelatine

1 litre blackcurrant and apple juice

2 ½ cups frozen raspberries

PLUS 3 punnets of fresh raspberries (to be used when assembling the trifle)

To make the jelly, combine gelatine and 250ml (1 cup) blackcurrant and apple juice in a large bowl and stir to combine. Set aside.

Place remaining blackcurrant and apple juice in a medium saucepan and bring to the boil over high heat. Pour over the gelatine mixture and whisk to dissolve all the gelatine. Set aside to cool slightly.

Pour into the base of a 24-26cm wide glass trifle dish. Scatter over the frozen raspberries and refrigerate to set.

Step 3: Make the Custard

2 cups cream

1 teaspoon vanilla bean extract

½ cup caster sugar

1 tablespoon cornflour

6 egg yolks, at room temperature

500g marscapone

To make the custard, place cream and vanilla in a small saucepan over medium-high heat until almost boiling.

Place egg yolks, sugar and cornflour in a small bowl and whisk to combine. Gradually whisk the hot cream into the egg mixture until combined.

Return the cream mixture to the saucepan, reduce heat to low, stirring until well combined and the custard is thick. Remove from the heat, pour into a large bowl, cover with plastic wrap and refrigerate until cold. Prior to assembling the trifle fold the marscapone through the custard to combine. (You can do this the day before)

Step 4: Assembling the trifle

Spoon half the custard over the set jelly. Top with your sponge-I put the whole sponge into the glass dish rather than cutting it up so it makes a lovely golden crumb layer in the trifle.   Arrange the 3 punnets of raspberries on top of the sponge and try to keep the raspberries near the glass upright so they create a lovely pink stripe in the bowl. Top the raspberries with the remaining custard and refrigerate.  

Step 5: Making the Italian Meringue

3 egg whites at room temperature

1 1/4 cups caster sugar

90ml water

1 teaspoon cream of tartar

To make the meringue, place the water, cream of tartar and half the sugar in a medium saucepan over medium-high heat. Bring to the boil and cook for 6 minutes, or until it reaches 115° on a sugar thermometer.

Meanwhile, place the egg whites in the bowl of an electric mixer and whisk on high until stiff peaks form. While the motor is running, add the remaining sugar 1 tablespoon at a time, whisking until glossy. Gradually add the hot syrup in a steady stream while the eggs are whisking and whisk for 8 minutes.

Step 6: Burnishing the Meringue!

Spoon the meringue onto the trifle, making swirls with the back of the spoon and, using a kitchen blowtorch, carefully toast until the meringue is golden (see tip).

Tips and hacks

If you don’t have a kitchen blowtorch, you can leave the meringue a glossy white, or dust it with crushed freeze-dried raspberries.

If you are running short on time you can use ready-made sponge and vanilla bean custard.

Introducing our new Bay Leaf and Dijon glazes!

We have two delicious new colours in the ceramics collection. Our Bay Leaf glaze is in conivial company when sharing a table with clementine, french vanilla, powder and peony pinks and dijon. Summer fruits like cherries work well with bay leaf as do Moroccan foods (think pearl couscous studded with dates, apricots and pistachios) or sweet reat like baklava.

Dijon is a warm, deep, luscious yellow that has a kinship with golden syrup, powder and peony pinks, cloud grey, french vanilla, bay leaf and clementine glazes. Its vivaciousness is enhanced when hosting variegated salad greens peppered with edible flowers, or chocolate concoctions with mixed berries.  We hope you enjoy them as much as we do!


Introducing our new Stackable Cups!

We are delighted to announce the launch of a new product in our online store this month. We're proud as punch and hope you like them too!

We thought it was time to revisit a design classic. Our brand new stackable cups, proudly designed and made in New Zealand, bring a column of vivid colour to kitchens (at home or work) and save on precious bench space. The prototypes for this design were lovingly made and tested over the past year and have been put to work in our home where they have already established themselves as firm family favourites.

You can mix and match your own colour palette from our fourteen delicious offerings. And the best news is that they comfortably fit under a coffee machine to hold that much needed morning tonic! 

A chocolate chip cookie recipe

I am quite a fan of Australian cook Bill Granger's books. His chocolate chip cookies are a family favourite. If you make a double batch you can freeze the raw cookie dough so you have some more of these heavenly treats at the ready when unexpected visitors arrive. You can cook the raw cookie dough from frozen at the temperature and cooking times stated below. 

Bill Granger's Chocolate Chip Cookies

125g unsalted butter, softened
1 1/4 cups tightly packed brown sugar
1 tsp vanilla essence
1 egg, lightly beaten
1 1/2 cups plain (all purpose) flour
1/2 tsp baking powder
a pinch of salt
1 1/2 cups chocolate bits

Preheat the oven to 180 degrees C (350 degrees F).
Place butter and sugar in a bowl and beat until light and creamy.
Add vanilla and egg and stir to combine.
Stir in the sifted flour, baking powder and salt until just combined.
Fold through chocolate chips.
Place spoonfuls of cookie mixture on a greased and lined baking tray, allowing room for spreading.
Cook for approx. 15-20 minutes until they turn pale gold.
Allow to cook on the tray for 5 minutes before placing biscuits on a wire rack to cool.
Makes 16.

Bill Granger, Bills Sydney Food, Murdoch Books: Sydney, 2000, p. 111.

Tarta de Santiago

Tarta de Santiago Cake on Zinnia Plate in Celadon
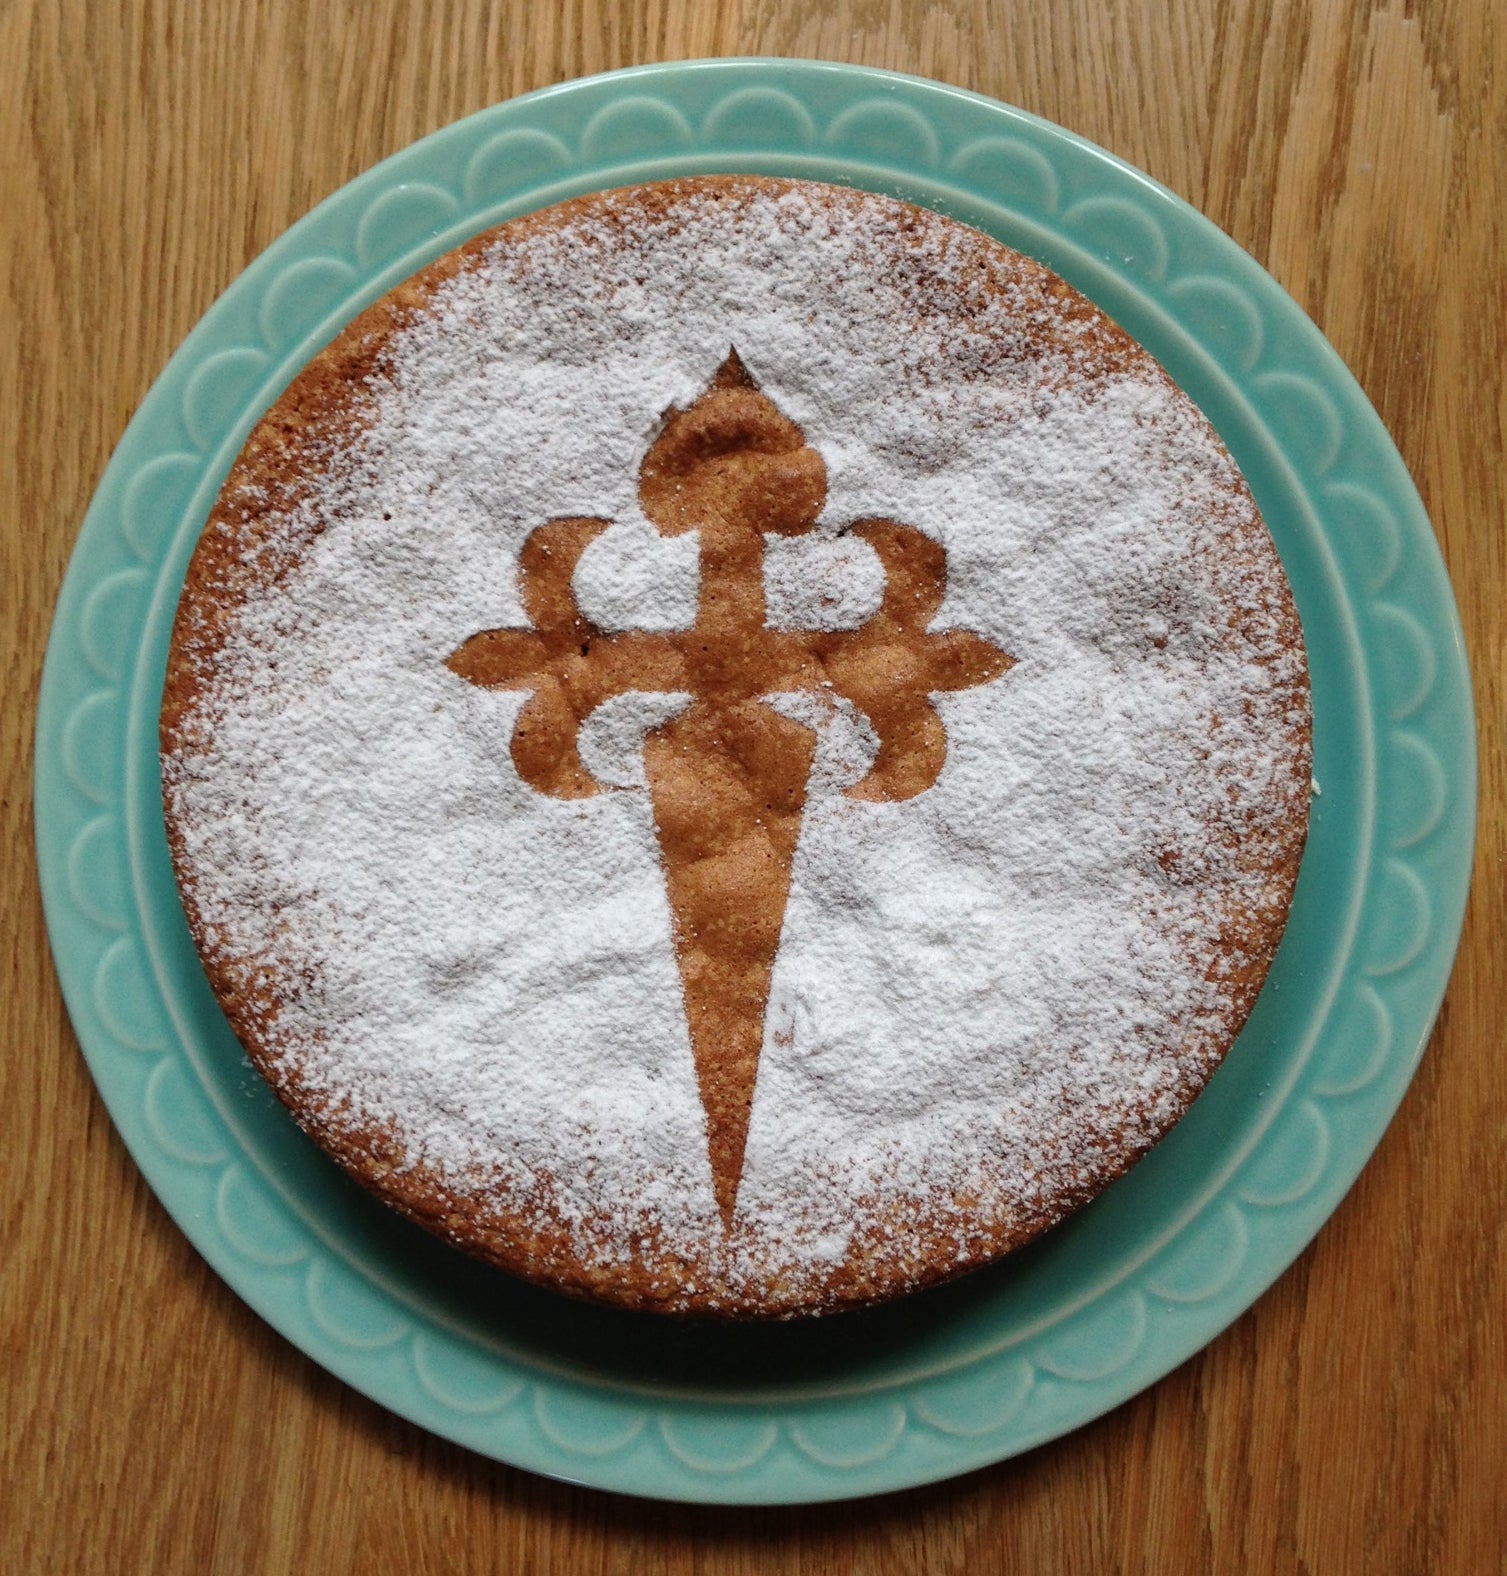
Tarta de Santiago would have to be my favourite almond-based, gluten free cake. It has a tender, citrus cake crumb and keeps extremely well, though I doubt it will bide much time on the kitchen table!

This recipe is by the celebrated cook, Claudia Roden, and can be found in her book “The Food of Spain: A Celebration," (Penguin, UK, 2012). I have substituted whole almonds (that required grinding) for ground almonds to save precious time. The cake is fêted in Southern Spain and has fascinating origins in religious traditions. Roden elucidates the cake’s origins as follows:

“This is a splendid cake which is normally made in a wide cake or tart tin and comes out low, but it is equally good as a thicker cake.
Pilgrims and tourists who visit the cathedral of Santiago de Compostela in Galicia, where the relics of the apostle Saint James are believed to be buried, see the cake in all the windows of every pastry shop and restaurant, decorated with the shape of the cross of the Order of Santiago. I have watched the cake being made in many sizes, big and small, over a pastry tart base at a bakery called Capri in Pontevedra. This deliciously moist and fragrant homely version is without a base.

When I suggested to a man associated with the Galicia tourist office that the tarta was a Jewish Passover cake, he dragged me to a television studio to explain all. The presenters liked the idea. The Galician city of A Coruña is on the Jewish tourist route. There is a synagogue and an old Jewish quarter there. Jews from Andalusia, fleeing the Berber Almohads' attempts to convert them, came to Galicia in the 12th and 13th centuries.”

Serves 10
250g ground almonds 
6 eggs, separated 
250g caster sugar 
grated zest of 1orange 
grated zest of 1 lemon 
4 drops almond extract 
butter to grease the cake tin 
flour (or cornflour for gf version) to dust the cake tin 
icing sugar for dusting the cake

Beat the egg yolks with the sugar to a pale cream with an electric mixer, then beat in the orange and lemon zest and almond extract. Add the ground almonds and mix very well.

With a cleaned mixer, whisk egg whites until stiff and fold into egg and almond mixture – the mixture is so thick you need to turn it over quite a bit into the egg whites. Grease a spring-form cake tin around 28cm in diameter (preferably non-stick) with butter and dust with flour or cornflour, then pour in the mixture.

Put the cake into an oven preheated to 180C/gas mark 4 for 40 minutes or until it feels firm. Let it cool before turning out. Dust the top with icing sugar. If you like, cut the shape of a Santiago cross out of paper and place it in the middle of the cake before dusting with icing sugar. Then remove the paper shape.
 

Meet the Makers Event at Tessuti for Mother's Day

A few weeks back I had the pleasure of participating in a "Meet the Makers" Mother's Day Event at Tessuti, a beautiful store that retails my ceramics in Herne Bay, Auckland. I spoke about the collection and then Jordan Rondel, The Caker, gave a cake decorating demonstration. Each guest was given a gorgeous plum, lime and coconut baby cake to adorn with vanilla bean cream cheese frosting, lime zest, freeze dried plums, toasted coconut and roses! You can purchase Jordan's cookbooks and cake mixes at Tessuti (and my ceramics of course!) Here are some lovely photos of the event taken by Yasmine Ganley.

Feature in Sunday Magazine

Thank-you Sunday magazine for featuring us in your 'Home' section a few weeks back. The beautiful photograph is by Patrick Reynolds. We were not sure how the shoot would turn out as we had four delicious cakes from Miann right in front of our son William and he was desperate to get stuck into them. Based upon this image he had clearly resigned himself to waiting!

  • Page 1 of 3
  • Page 1 of 3